bookmark_borderCamera Orbit
As an amateur, I don’t know what I’m doing most of the time. When I set out to do this, all I knew was I wanted my device to automatically redirect users to a page after they connect to it’s wifi network, just like airports and hotels do. Turns out this is called a captive portal. I struggled for awhile to get this to work, so I’ll try to point out what does what in this example.
One (ab)use case for this is for projects that use a web page for configuration. Normally you need to navigate to that page with the IP address in a browser… which means you have to write it down somewhere, or print it on a display (if you have one), or my next best idea: print a QR code with a hyperlink to it. It is better if we can redirect the device right to the page we want without fussing around.

Modern devices (windows, android, probably apple) and web browsers like to check to see if a newly connected WIFI network has internet access. They reach out to some known location, and if they get the right response, decide to stay connected and do their thing. Luckily there is a behavior on these devices designed to send you to a network sign-on page if it doesn’t get the reply it was hoping for, and that’s what this takes advantage of. Basically:
An ESP32, nothing else. Easiest way is to use one of the dev boards available on amazon/ebay/whatever. It may be necessary to power it externally, as some modules have power issues over USB and may trigger the brownout detector when activating wifi. This is probably applicable to the ESP8266, or anything else using these libraries.
I am using VS Code and Platform.io. Should also work with the Arduino IDE as long as you add the required libraries. Builtin libraries: wifi.h, dnsserver.h Other libraries:
This is all available on Github here: https://github.com/elliotmade/ESP32-Captive-Portal-Example
/* ESP-32 Captive portal example
 * github.com/elliotmade/ESP32-Captive-Portal-Example
 * This isn't anything new, and doesn't do anything special
 * just an example I would have appreciated while I was searching for a solution
 */


#include <Arduino.h>
#include <AsyncTCP.h>
#include "ESPAsyncWebServer.h"
#include "DNSServer.h"


const char* ssid = "test_captive_portal"; //Name of the WIFI network hosted by the device
const char* password =  "";               //Password

AsyncWebServer server(80);                //This creates a web server, required in order to host a page for connected devices

DNSServer dnsServer;                      //This creates a DNS server, required for the captive portal


void webServerSetup(){

  //This is a super simple page that will be served up any time the root location is requested.  Get here intentionally by typing in the IP address.
  server.on("/", HTTP_GET, [](AsyncWebServerRequest *request){
    request->send(200, "text/html", "<!DOCTYPE html><html><head><title>Success</title></head><body><p>Hooray</p></body>");
    Serial.println("requested /");
  });


  //This is an example of triggering for a known location.  This one seems to be common for android devices
  server.on("/generate_204", HTTP_GET, [](AsyncWebServerRequest *request){
    request->send(200, "text/plain", "You were sent here by a captive portal after requesting generate_204");
    Serial.println("requested /generate_204");
  });

  //This is an example of a redirect type response.  onNotFound acts as a catch-all for any request not defined above
  server.onNotFound([](AsyncWebServerRequest *request){
    request->redirect("/");
    Serial.print("server.notfound triggered: ");
    Serial.println(request->url());       //This gives some insight into whatever was being requested
  });

  server.begin();                         //Starts the server process
  Serial.println("Web server started");
}


void setup() {

  Serial.begin(115200);

  WiFi.softAP(ssid, password);            //This starts the WIFI radio in access point mode
  Serial.println("Wifi initialized");

  Serial.println(WiFi.softAPIP());        //Print out the IP address on the serial port (this is where you should end up if the captive portal works)

  dnsServer.start(53, "*", WiFi.softAPIP());  //This starts the DNS server.  The "*" sends any request for port 53 straight to the IP address of the device

  webServerSetup();                       //Configures the behavior of the web server

  Serial.println("Setup complete");
}


void loop() {
  dnsServer.processNextRequest();         //Without this, the connected device will simply timeout trying to reach the internet
                                          //or it might fall back to mobile data if it has it

}Thanks to other humans that shared info about this already. I’m not doing anything new, but just trying to explain things in a way that makes sense to me…
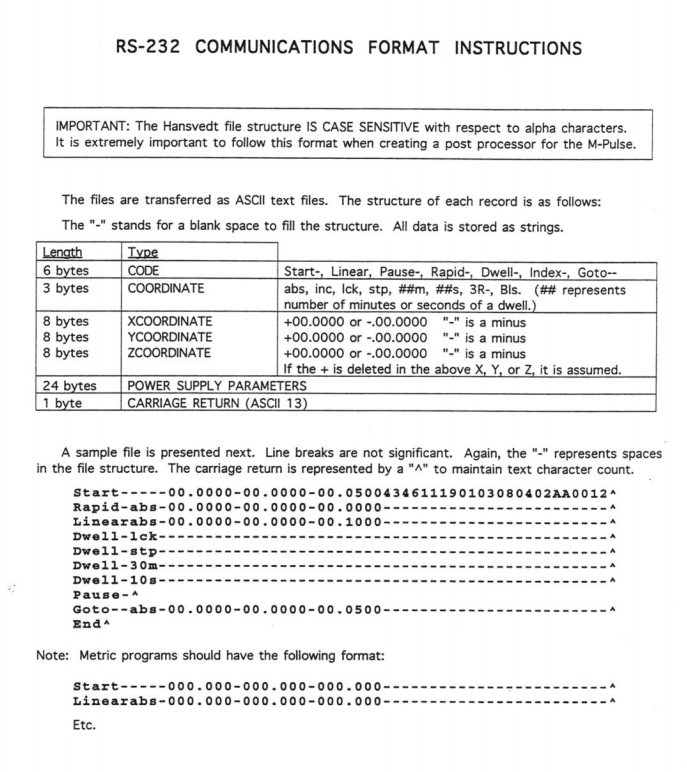
Here’s a tool to write programs for a Hansvedt MS-4 Foreman CNC EDM. The control reads and writes programs in a .TXT file format. I believe there was a standalone console/computer you could have purchased for programming at one time… but I doubt you’d find one no matter how hard you looked. Programs can be input directly on the control using the keyboard and scroll wheel of course, but that’s no fun.
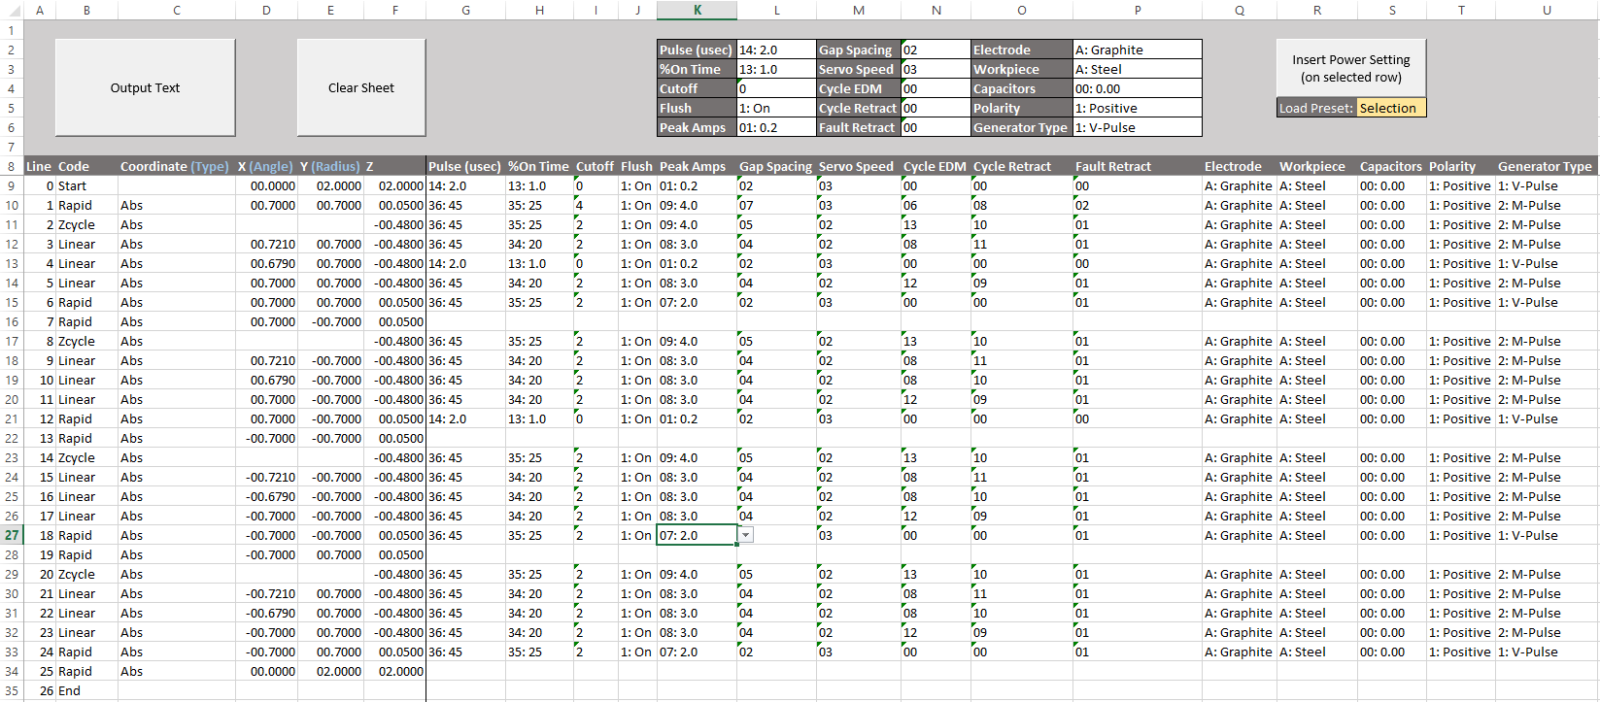
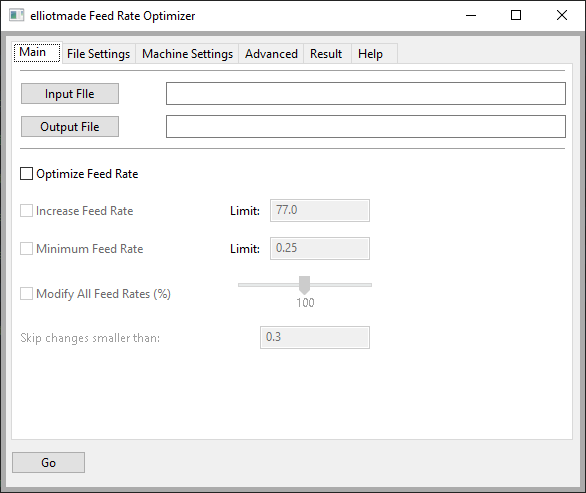
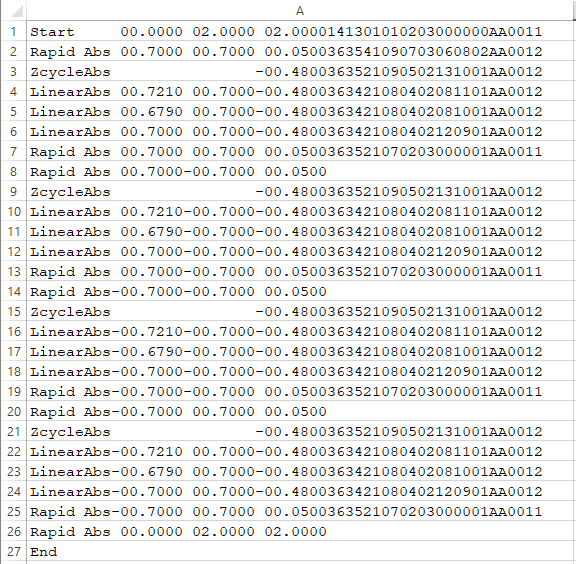
All of the same functions should be available here as they are on the control. Build your program line by line, then export it to a text file:
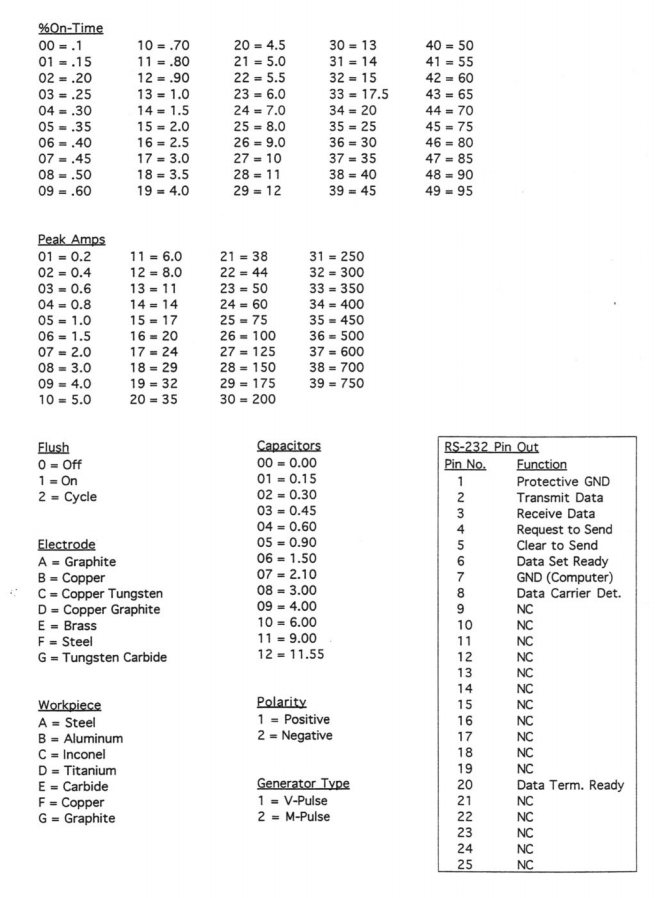
There are also a few nifty things included: existing files can be imported, edited, then output again, and there is also a sheet for saving power settings. The spec is based on these three pages from the manual:

Transfer the file using a floppy drive (hah!) or figure out the RS-232 connection. I made this for just one person, but if you happen to find this useful please let me know, that would make my day! Download it here:
Hope this helps somebody, there’s a serious shortage of info on these machines findable by google – not much on discussion boards either. I’m working on a excel utility to write programs for it that can be transferred on a floppy drive instead of programming on the control directly.
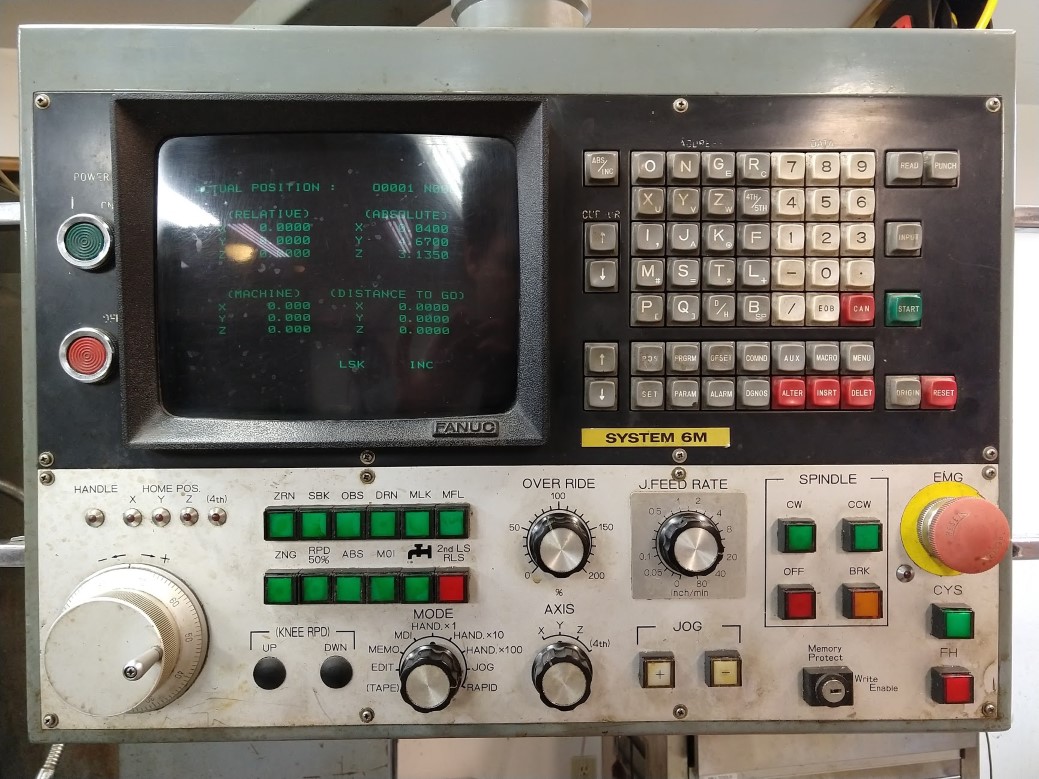
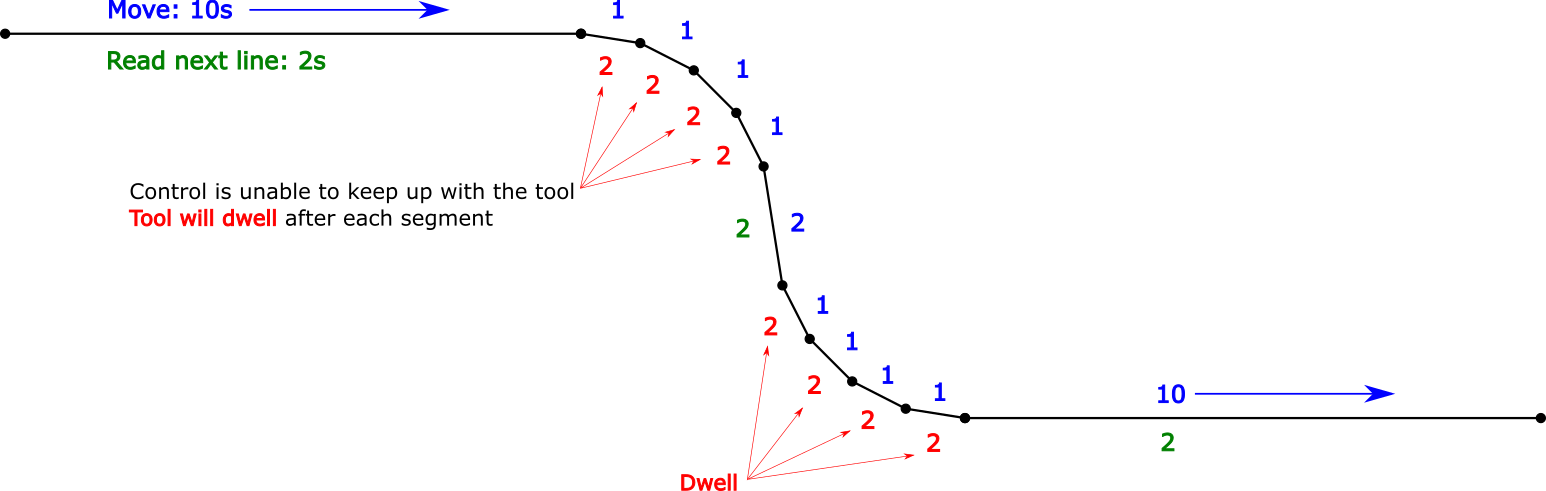
This memory in this control is measured in meters, meters of punched paper tape. Mine holds 80 meters or roughly 32kb, which is a serious limitation on the size of program I can store on it. Luckily it also came with a tape reader and has a BTR (behind the tape reader) device that interfaces with a PC serial port and emulates the tape reader; this allows you to “drip-feed” a program from the computer through the tape interface. This works around the memory limitation and lets you run any length of program, but it has a major drawback: it’s really slow. This can make a situation where the control can’t read in the next line of a program before the current one has completed, resulting in jerky movement as the machine will pause until the next command is ready. This is like driving with GPS navigation that is so bad that you have to stop after every turn to get the next one. You’ll know it when it happens, you can hear it, see it, your surfaces will show it, and your cutters hate it.
There process starts on the computer. I’m using DNC4U to send programs through a USB serial adapter to the BTR, which is connected directly to the tape reader port on the control board. The control reads each character and line, calculates the motion, then tells the servo drives to execute it. Here’s what I’ve got:
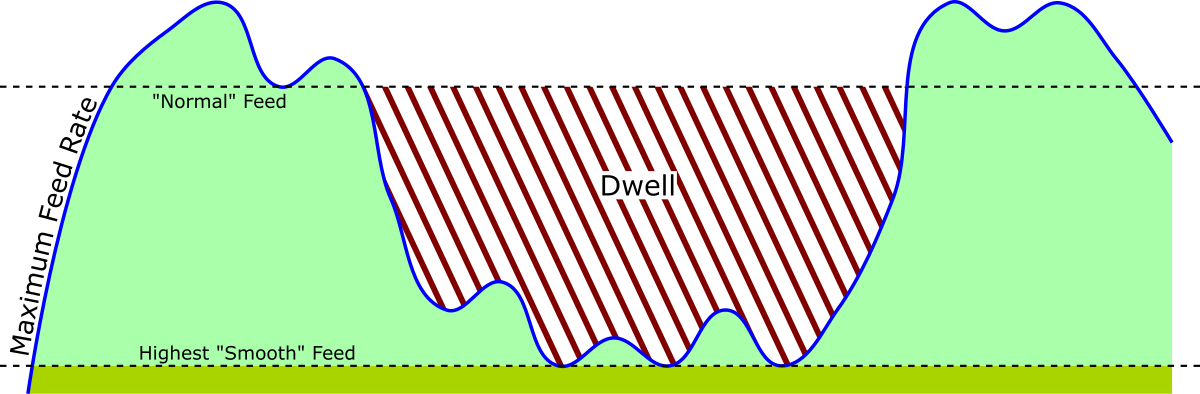
The key problem here is the relationship between the speed that a line can be read by the control to the feed rate and length of the previous line. Long moves or canned cycles where the physical motion takes longer than reading the next line are no problem, but short movements are a problem. This is particularly bad if you have surfaces or curves that are composed of tiny line segments.
I did an experiment using two short programs of .005″ moves: the first program had very short lines like this: “X.005; X.010; X.015;” and so on; the second had relatively long lines like this: “G01 X0.0050 Y0.000 Z0.000 F100.;”. I set up a dial indicator so I could easily see the motion and used the feed rate override knob to find the point at which it went from jerky to smooth. What I found was that the program with short lines could run smoothly at about 1.6 inches per minute, and the longer lines only ran at .5. Since the only variable is the character count on the lines, I am able to determine the relationship between the line length and read time.
Actually this is pretty straightforward. First, figure out how fast the control can read lines and characters. Next calculate the distance traveled for each line in the program, and finally do some math to determine the minimum time required for the control to read that next line and set the speed accordingly. Mission accomplished.
I’m using this as an excuse to try python and create a standalone application for the first time. The project can be found here on Github. I would describe it as a “working prototype” at this stage, and I’ll post again as I get further along. Here’s what it looks like so far: